Loading Data from SQL Server to Oracle Database Using ODBC Connection

Step 1:
Creating an ODBC connection:
n To create an ODBC connections go to ->Control Panel -> Administrative Tools.
n Double Click on Data Sources (ODBC).
n Choose System DSN tab.
n Click Add button.

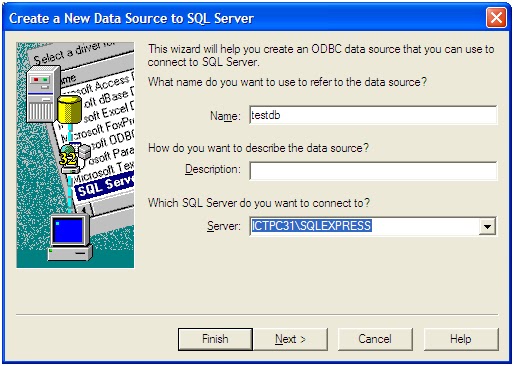
n
Choose SQL
Server and click Finish button.
n
Choose name of Connection and select server.
n Click Next>.
n Click Next>.


n Click Next >.
n Click “Change the default database to:” option and select the database from which you want to fetch data to oracle.
n Click Next >,
n
Click Test
Data Source to test the connection.

n If successful the following the system will show some window like the following.

n
Click OK
to exit.
Step 2: Import – Using PL/SQL Developer Tool:
n Connect to the Destination Oracle Database by PL/SQL Developer tool.
n From “Tools” menu go to the ODBC Importer sub menu.

n The window will look like the following.

n
On Data
from ODBC tab – Select System DSN
specified, User Name, Password and click Connect on The ODBC connection will show all the tables that your
SQL Server Database has.
n Now carefully select the source table from which data will be loaded into oracle db.

n Now go to the Data to Oracle tab next to the Data from ODBC tab.
n Select Owner and Table to which data from ODBC will be loaded.n Remember that both the SQL Server table and Oracle table structures need to be same.

n Now click IMPORT
button to import data from SQL Server connected by ODBC connection to Oracle
Database.

- All data from the SQL Server to the ORACLE will be loaded.
-----------------------------------------------------------------------------------------------------------
Thanks for reading this article.
hAPPY tO hELP!!!
very helpful article.. thanks!
ReplyDeleteYou are welcome!!!
ReplyDeleteUclamamma-te Joshua Martin https://my.workplan-e.net/profile/stubbornreyginstubborn/profile
ReplyDeletegraninmasic